
前言
国庆假期,一直没有时间更新。
根据群里面的同学的提问,强烈推荐大家先熟悉下spring cloud。文章下面有纯洁大神的spring cloud系列。
上一章最后说了,因为服务是不对外暴露的,所以在外网要访问服务必须通过API网关来完成,而spring cloud 提供了现成的Api网关组件zuul。它包含了路由,授权,压力测试等一系列功能。如下图所示,Api网关在整个应用环境的位置。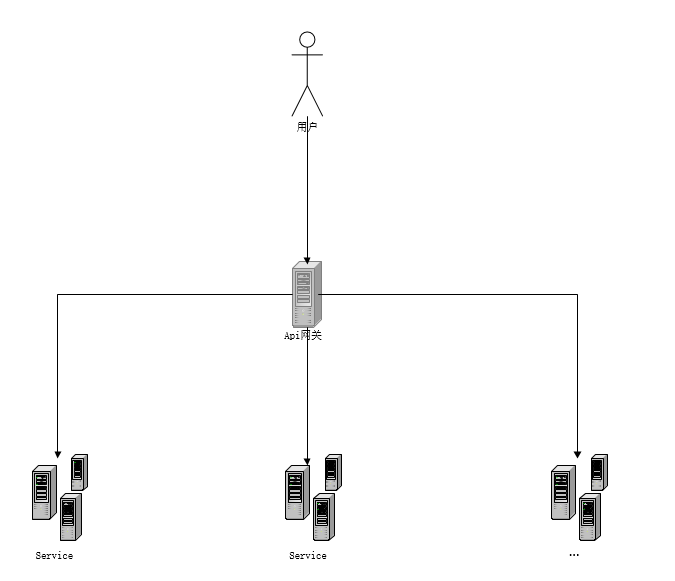
业务场景
我们先模拟一个业务场景,客户端(web,ios,android...)通过Api网关访问订单服务,订单服务有两个节点,为了模拟集群效果,这两个节点分别返回不同的数据。那么我们一共需要创建4个应用程序。服务中心(Java)、Api网关(Java)、订单服务1(.NET Core)、订单服务2(.NET Core)。
代码部分
服务中心
使用intellij idea创建一个spring boot项目,创建服务中心。设置端口为5000。
pom.xml
<dependency>
    <groupId>org.springframework.cloud</groupId>
    <artifactId>spring-cloud-starter-eureka-server</artifactId></dependency>
ServiceCenterApplication.java
@EnableEurekaServer@SpringBootApplicationpublic class ServiceCenterApplication {

    public static void main(String[] args) {
        SpringApplication.run(ServiceCenterApplication.class, args);
    }
}
application.properties
spring.application.name=service-center
server.port=5000
Api网关
使用intellij idea创建一个spring boot项目,创建Api网关服务。设置端口为5555。
pom.xml
<dependency>
    <groupId>org.springframework.cloud</groupId>
    <artifactId>spring-cloud-starter-eureka</artifactId></dependency><dependency>
    <groupId>org.springframework.cloud</groupId>
    <artifactId>spring-cloud-starter-zuul</artifactId></dependency>
ServiceGatewayApplication.java
@SpringBootApplication@EnableZuulProxypublic class ServiceGatewayApplication {

    public static void main(String[] args) {
        SpringApplication.run(ServiceGatewayApplication.class, args);
    }
}
application.properties
spring.application.name=service-gateway
server.port=5555eureka.client.serviceUrl.defaultZone=http://localhost:5000/eureka/#下面的代码可以注释zuul.routes.order.path=/order/**
zuul.routes.order.serviceId=order
上面配置是不是和nginx很像。zuul还提供了默认规则,http://ZUUL_HOST:ZUUL_PORT/serviceId/**,满足这一规则的会自动代理,如上面的配置完全可以不用写,这样大量的服务就不用一个一个配置了。
订单服务1
使用vs2017创建 .NET Core Web Api应用程序
appsettings.json
{
  "Logging": {
    "IncludeScopes": false,
    "LogLevel": {
      "Default": "Warning"
    }
  },
  "spring": {
    "application": {
      "name": "order"
    }
  },
  "eureka": {
    "client": {
      "serviceUrl": "http://localhost:5000/eureka/"
    },
    "instance": {
      "port": 8010
    }
  }
}
ValuesController.cs
[Route("/")]public class ValuesController : Controller{
    [HttpGet]    public string Get()    {        return "order1";
    }
}
订单服务2
同订单服务1的创建过程,修改端口为8011和返回结果。
appsettings.json
{
  "Logging": {
    "IncludeScopes": false,
    "LogLevel": {
      "Default": "Warning"
    }
  },
  "spring": {
    "application": {
      "name": "order"
    }
  },
  "eureka": {
    "client": {
      "serviceUrl": "http://localhost:5000/eureka/"
    },
    "instance": {
      "port": 8011
    }
  }
}
ValuesController.cs
[Route("/")]public class ValuesController : Controller{
    [HttpGet]    public string Get()    {        return "order2";
    }
}
篇幅有限,以上代码均有精简,完整代码请去Github上获取。
我们现在一共有4个应用程序:
- eureka服务中心,端口5000,应用名称service-center
- zuul网关服务,端口5555,应用名称service-gateway
- 订单服务1,端口8010,应用名称order
- 订单服务2,端口8011,应用名称order
其中订单服务1和订单服务2组成了订单服务集群
分别启动这4个应用程序。打开eureka服务:http://localhost:5000/,
如下图所示都注册成功。

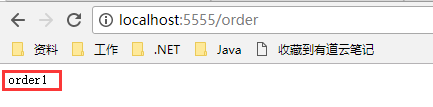
打开http://localhost:5555/order,返回"order1"
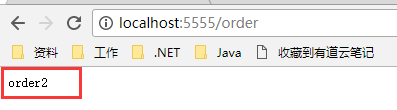
刷新后返回"order2",反复多次刷新,"order1"和"order2"依次返回。
后记
通过上面的例子说明Api网关服务已经生效,并且实现了负载均衡。结合具体的业务场景,我们的生产环境只对外暴露5555端口,客户端访问Api网关,由Api网关去路由到各个服务节点,这样所有的客户端调用都统一了入口。
示例代码
所有代码均上传github。
求推荐,你们的支持是我写作最大的动力,我的QQ群:328438252,交流微服务。
参考资料
java部分
.net部分