
前言
这篇文章拖太久了,因为最近实在太忙了,加上这篇文章也非常长,所以花了不少时间,给大家说句抱歉。好,进入正题。目前的项目基本都是前后端分离了,前端分Web,Ios,Android。。。,后端也基本是Java,.NET的天下,后端渲染页面的时代已经一去不复返,当然这是时代的进步。前端调用后端服务目前大多数基于JSON的HTTP服务,那么就引入的我们今天的内容。客户端访问服务的时候怎么保证安全呢?很多同学都听说过OAuth2.0,都知道这个是用来做第三方登录的,实际上它也可以用来做Api的认证授权。不懂OAuth的同学可以先去看看阮一峰的OAuth的讲解,如果你看不懂的话,那就对了,笔者当初也看了很久,结合实际项目才明白。这章我会结合具体的例子帮助大家理解。同时也也会结合前几章的内容做一个整合,让大家对微服务架构以及API授权有一个更清晰的认识。
业务场景
程序清单列表
- 服务中心
- API网关
- 认证授权中心
- 用户中心
-
订单中心
用户中心和认证授权中心有耦合的情况,访问认证授权的时候要去验证用户的账号密码是否合法
下图是一个简单的架构草图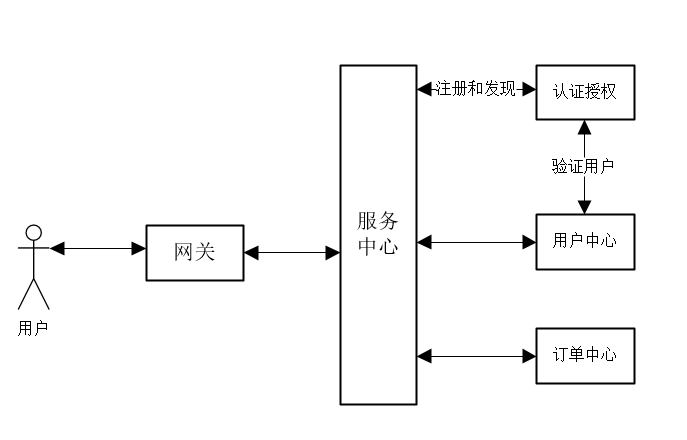
服务中心和API网关大家看之前的文章来搭建,也可以直接看github上的源代码,没有什么变化。
认证授权中心
一直在说Ids4(IdentityServer4)这个框架,它实际上是一个实现了OAuth+OIDC(OpenId Connect)这两个功能的解决方案。那么OAuth和OIDC又到底是什么东西呢?简单来说OAuth就是帮助我们做授权获取token的,而OIDC就是帮助我们做认证这个token合法性的。一个完整的授权认证系统应该包含这两个功能。那么我们再谈一谈token,Ids4提供2种完全不一样的token加密方式,一种是JWT另一种叫Reference。那么这两种加密方式有何不同呢?JWT就是对这个字符串的一个加密算法,这个字符串包含了用户信息,客户端可以直接解析token,拿到用户信息,不需要和认证服授权务器去交互(程序首次加载的时候交互一次)。Reference更像Session,需要和认证服务器交互,由认证授权服务器去验证是否合法,每一次访问都需要和认证服务器进行交互,并且用户信息也是通过认证成功以后返回的。这两种方式各有优缺点。
JWT是一种加密方式,那么认证服务器不需要对token进行存储,而客户端也不需要找服务端验证,那么对于程序的性能是有很大的提升的,也不用考虑分布式和存储的问题,但是对于生成的token没办法控制,只能通过时效性来过期。
Reference的方式,token需要考虑分布式的存储,而且客户端需要一直和服务端认证,有一定的性能损耗,但是服务端可以对token进行控制,比如登出用户,修改密码都可以作废掉已经生成的token,这个时候再拿这个token是没办法使用的。然而不管是APP还是WEB让用户主动登出操作这是一个非常伪的需求,实际上即使是Reference方式token依然靠时效性来控制。
那么问题来了,当你的上级不懂技术的时候,问你万一我的token泄露了怎么办?你可以这样回答他。如果是在传输过程中的泄露,那么我们可以通过HTTPS的方式加密。程序代码里面用户相关的操作,都应该对传递的UserId参数和token里面解析出来UserId进行比较,如果出现不一致,那么这一定是一个非法请求。例如张三拿着李四的token去修改密码,肯定是修改不成功的。如果是在用户的客户端(WEB,APP)就把token泄露了,那么这个实际上这个客户端已经不止token泄露这么简单了,包括他所有的用户信息都泄露了,这个时候token已经没有了意义。就好比腾讯QQ加密算法做的如何如何牛逼,但是你泄露了你的QQ号和密码...
我们可以在过期时间上尽量短一点,客户端通过刷新token的方式不断获取新的token,而达到用户不用重复的登录,就能一直访问API接口。
至于两种方式的安全性我觉得都一样,微服务中我更倾向JWT这种方式,简单,高效。下面的代码我会模拟这两种模式,至于具体选择哪种方式大家根据实际的业务需求来。
小插曲:和几位技术大牛经过激烈的讨论,大家一致认为服务与服务之间的通信也是需要认证的,这样虽然增加了一定的性能损耗但是却更加的安全。我觉得有句话说的非常好,原则上内部其它系统都是不可信的。所以微服务之间的访问也得认证。
Reference方式的token,Ids4默认采用的内存做存储,也提供了EF for MS SQL 做分布式存储,而我们这里并不采用这种方式,我们采用redis来作为token的存储。
添加nuget引用
<PackageReference Include="Foundatio.Redis" Version="5.1.1478" />
<PackageReference Include="IdentityServer4" Version="2.0.2" />
<PackageReference Include="Pivotal.Discovery.Client" Version="1.1.0" />
Config.cs
配置Client信息,我们创建2个Client,一个采用JWT,一个采用Reference方式
new Client
{
    ClientId = "client.jwt",
    ClientSecrets =
    {        new Secret("AB2DC090-0125-4FB8-902A-34AFB64B7D9B".Sha256())
    },
    AllowedGrantTypes = GrantTypes.ResourceOwnerPassword,
    AllowOfflineAccess = true,
    AccessTokenLifetime = accessTokenLifetime,
    AllowedScopes =
    {        "api1"
    },
    AccessTokenType =AccessTokenType.Jwt
}new Client
{
    ClientId = "client.reference",
    ClientSecrets =
    {        new Secret("A30E6E57-086C-43BE-AF79-67ADECDA0A5B".Sha256())
    },
    AllowedGrantTypes = GrantTypes.ResourceOwnerPassword,
    AllowOfflineAccess = true,
    AccessTokenLifetime = accessTokenLifetime,
    AllowedScopes =
    {        "api1"
    },
    AccessTokenType =AccessTokenType.Reference
},
RedisPersistedGrantStore.cs
实现IPersistedGrantStore接口来支持redis
public class RedisPersistedGrantStore : IPersistedGrantStore{    private readonly ICacheClient _cacheClient;    private readonly IConfiguration _configuration;    public RedisPersistedGrantStore(ICacheClient cacheClient, IConfiguration configuration)    {
        _cacheClient = cacheClient;
        _configuration = configuration;
    }    public Task StoreAsync(PersistedGrant grant)    {        var accessTokenLifetime = double.Parse(_configuration.GetConnectionString("accessTokenLifetime"));        var timeSpan = TimeSpan.FromSeconds(accessTokenLifetime);
        _cacheClient?.SetAsync(grant.Key, grant, timeSpan);        return Task.CompletedTask;
    }    public Task<PersistedGrant> GetAsync(string key)    {        if (_cacheClient.ExistsAsync(key).Result)
        {            var ss = _cacheClient.GetAsync<PersistedGrant>(key).Result;            return Task.FromResult<PersistedGrant>(_cacheClient.GetAsync<PersistedGrant>(key).Result.Value);
        }        return Task.FromResult<PersistedGrant>((PersistedGrant)null);
    }    public Task<IEnumerable<PersistedGrant>> GetAllAsync(string subjectId)
    {        var persistedGrants = _cacheClient.GetAllAsync<PersistedGrant>().Result.Values;        return Task.FromResult<IEnumerable<PersistedGrant>>(persistedGrants
            .Where(x => x.Value.SubjectId == subjectId).Select(x => x.Value));
    }    public Task RemoveAsync(string key)    {
        _cacheClient?.RemoveAsync(key);        return Task.CompletedTask;
    }    public Task RemoveAllAsync(string subjectId, string clientId)    {
        _cacheClient.RemoveAllAsync();        return Task.CompletedTask;
    }    public Task RemoveAllAsync(string subjectId, string clientId, string type)    {        var persistedGrants = _cacheClient.GetAllAsync<PersistedGrant>().Result.Values
            .Where(x => x.Value.SubjectId == subjectId && x.Value.ClientId == clientId &&
                        x.Value.Type == type).Select(x => x.Value);        foreach (var item in persistedGrants)
        {
            _cacheClient?.RemoveAsync(item.Key);
        }        return Task.CompletedTask;
    }
}
ResourceOwnerPasswordValidator.cs
实现IResourceOwnerPasswordValidator接口实现自定义的用户验证逻辑
public class ResourceOwnerPasswordValidator : IResourceOwnerPasswordValidator{
 private readonly DiscoveryHttpClientHandler _handler;

   private const string UserApplicationName = "user";

   public ResourceOwnerPasswordValidator(IDiscoveryClient client)    {
        _handler = new DiscoveryHttpClientHandler(client);
    }

    public async Task ValidateAsync(ResourceOwnerPasswordValidationContext context)    {
      //调用用户中心的验证用户名密码接口
        var client = new HttpClient(_handler);
        var url = $"http://{UserApplicationName}/search?name={context.UserName}&password={context.Password}";
        var result = await client.GetAsync(url);

        if (result.IsSuccessStatusCode)
        {
          var user = await result.Content.ReadAsObjectAsync<dynamic>();
           var claims = new List<Claim>() { new Claim("role", user.role.ToString()) };
            context.Result = new GrantValidationResult(user.id.ToString(), OidcConstants.AuthenticationMethods.Password, claims);
        }
        else
        {
            context.Result = new GrantValidationResult(null);
        }
    }
}
var claims = new List<Claim>() { new Claim("key", "value") };
这里可以传递自定义的用户信息,在客户端通过User.Claims.FirstOrDefault(x => x.Type == "key")来获取
这里需要注意一下,因为这里走的是http所以,授权服务中心和用户中心存在耦合,我个人建议如果走JWT的方式,用户中心和认证授权中心可以合并成一个服务,如果采用Reference的方式,建议还是拆分。
Startup.cs
public void ConfigureServices(IServiceCollection services){
    services.AddDiscoveryClient(Configuration);
    var redisconnectionString = Configuration.GetConnectionString("RedisConnectionString");
    var config = new Config(Configuration);
    services.AddMvc();
    services.AddIdentityServer({
                    x.IssuerUri = "http://identity";
                    x.PublicOrigin = "http://identity";
                })
        .AddDeveloperSigningCredential()
        .AddInMemoryPersistedGrants()
        .AddInMemoryApiResources(config.GetApiResources())
        .AddInMemoryClients(config.GetClients());
    services.AddSingleton(ConnectionMultiplexer.Connect(redisconnectionString));
    services.AddTransient<ICacheClient, RedisCacheClient>();//注入redis
    services.AddSingleton<IPersistedGrantStore, RedisPersistedGrantStore>();
    services.AddTransient<IResourceOwnerPasswordValidator, ResourceOwnerPasswordValidator>();
}

public void Configure(IApplicationBuilder app, IHostingEnvironment env){
 if (env.IsDevelopment())
    {
        app.UseDeveloperExceptionPage();
    }

    app.UseMvc();
    app.UseDiscoveryClient();
    app.UseIdentityServer();

}
因为是采用服务发现的方式,所以我们这里要修改IssuerUri和PublicOrigin。不要让发现服务暴露自己的具体URL地址,否则这里就负载不均衡了。
appsettings.json
"ConnectionStrings": {
 "RedisConnectionString": "localhost",
   "AccessTokenLifetime": 3600 //token过期时间 单位秒
    },
     "spring": {
      "application": {
           "name": "identity"
        }
    },
    "eureka": {
     "client": {
       "serviceUrl": "http://localhost:5000/eureka/"
        },
         "instance": {
           "port": 8010
        }
    }
用户中心
用户中心主要实现2个接口,一个给授权中心验证用户使用,还有一个是给客户端登录的时候返回token使用
nuget引用
<PackageReference Include="IdentityModel" Version="2.14.0" />
<PackageReference Include="Pivotal.Discovery.Client" Version="1.1.0" />
appsettings.json
{  "spring": {
"application": {
 "name": "user"
    }
  },
   "eureka": {
   "client": {
     "serviceUrl": "http://localhost:5000/eureka/"
    },
     "instance": {
         "port": 8040,
         "hostName": "localhost"
    }
  },
   "IdentityServer": {
    //jwt    "ClientId": "client.jwt",        "ClientSecrets": "AB2DC090-0125-4FB8-902A-34AFB64B7D9B"
    //reference
    //"ClientId": "client.reference",
    //"ClientSecrets": "A30E6E57-086C-43BE-AF79-67ADECDA0A5B"
  }
}
ValuesController.cs
[Route("/")]
public class ValuesController : Controller{
 private const string IdentityApplicationName = "identity";

  private readonly DiscoveryHttpClientHandler _handler;
     private readonly IConfiguration _configuration;

   public ValuesController(IDiscoveryClient client, IConfiguration configuration)    {
        _configuration = configuration;
        _handler = new DiscoveryHttpClientHandler(client);
    }

    [HttpGet("search")]
    public IActionResult Get(string name, string password)    {
        var account = Account.GetAll().FirstOrDefault(x => x.Name == name && x.Password == password);
        if (account != null)
        {
         return Ok(account);
        }
        else
        {
        return NotFound();
        }
    }
    [HttpPost("Login")]
    public async Task<IActionResult> Login([FromBody] LoginRequest input)    {
     var discoveryClient = new DiscoveryClient($"http://{IdentityApplicationName}", _handler)
        {
            Policy = new DiscoveryPolicy { RequireHttps = false }
        };
        var disco = await discoveryClient.GetAsync();
         if (disco.IsError) throw new Exception(disco.Error);
        var clientId = _configuration.GetSection("IdentityServer:ClientId").Value;
        if (string.IsNullOrEmpty(clientId)) throw new Exception("clientId is not value.");
        var clientSecrets = _configuration.GetSection("IdentityServer:ClientSecrets").Value;
        if (string.IsNullOrEmpty(clientSecrets)) throw new Exception("clientSecrets is not value.");
           var tokenClient = new TokenClient(disco.TokenEndpoint, clientId, clientSecrets, _handler);
           var response = await tokenClient.RequestResourceOwnerPasswordAsync(input.Name, input.Password, "api1 offline_access");//如果需要刷新token那么这里要多传递一个offline_access参数,不传的话RefreshToken为null
        var response = await tokenClient.RequestResourceOwnerPasswordAsync(input.Name, input.Password, "api1");
        if (response.IsError) throw new Exception(response.Error);
          return Ok(new LoginResponse()
        {
            AccessToken = response.AccessToken,
            ExpireIn = response.ExpiresIn,
            RefreshToken = response.RefreshToken
        });
    }
}
这里offline_access这个参数很重要,如果你需要刷新token必须传这个参数,传递了这个参数以后redis服务器会记录,通过refreshToken来获取一个新的accessToken,这里就不做演示了,Ids4的东西太多了,更细节的东西大家去关注Ids4的内容
Account.cs
提供2个用户,各有不同的角色
 public class Account
    {
    public string Name { get; set; }
     public string Password { get; set; }
       public int Id { get; set; }
    public string Role { get; set; }
     public static List<Account> GetAll()        {
          return new List<Account>()
            {                new Account()
                {
                    Id = 87654,
                    Name = "leo",
                    Password = "123456",
                    Role = "admin"
                },                new Account()
                {
                    Id = 45678,
                    Name = "mickey",
                    Password = "123456",
                    Role = "normal"
                }
            };
        }
    }
订单中心
nuget引用
<PackageReference Include="IdentityServer4.AccessTokenValidation" Version="2.1.0" />
<PackageReference Include="Pivotal.Discovery.Client" Version="1.1.0" />
Startup.cs
public void ConfigureServices(IServiceCollection services){
    services.AddDiscoveryClient(Configuration);
    var discoveryClient = services.BuildServiceProvider().GetService<IDiscoveryClient>();
    var handler = new DiscoveryHttpClientHandler(discoveryClient);
    services.AddAuthorization();
    services.AddAuthentication(x =>
        {
            x.DefaultChallengeScheme = JwtBearerDefaults.AuthenticationScheme;
            x.DefaultAuthenticateScheme = JwtBearerDefaults.AuthenticationScheme;
        })
    .AddIdentityServerAuthentication(x =>
     {
         x.ApiName = "api1";
         x.ApiSecret = "secret";
         x.Authority = "http://identity";
         x.RequireHttpsMetadata = false;
         x.JwtBackChannelHandler = handler;
         x.IntrospectionDiscoveryHandler = handler;
         x.IntrospectionBackChannelHandler = handler;
     });
    services.AddMvc();
}
这里需要注意的一点是handler,Ids4竟然在参数里面有handler的参数,这样我们接入微服务里面的服务发现简直太easy了。同时这里也给大家一个启发,我们再做第三方接口的时候,一定要参数齐全,哪怕这个参数并不会被大多数情况下使用,如果Ids4没提供这个参数,那么我就需要重写一套验证逻辑了。
ValuesController.cs
添加4个接口,针对不同的角色用户
[Route("/")]
public class ValuesController : Controller{    // admin role
    [HttpGet("admin")]
    [Authorize(Roles = "admin")]
    public IActionResult Get1()    {
       var userId = User.Claims.FirstOrDefault(x => x.Type == "sub")?.Value;
       var role = User.Claims.FirstOrDefault(x => x.Type == "role")?.Value;
       return Ok(new { userId, role });
    }    // normal role
    [HttpGet("normal")]
    [Authorize(Roles = "normal")]
    public IActionResult Get2()    {
      var userId = User.Claims.FirstOrDefault(x => x.Type == "sub")?.Value;
      return Ok(new { role = "normal", userId = userId });
    }    // any role
    [HttpGet("any")]
    [Authorize]
    public IActionResult Get3()    {
      var userId = User.Claims.FirstOrDefault(x => x.Type == "sub")?.Value;
      return Ok(new { role = "any", userId = userId });
    }    // Anonymous
    [HttpGet]
    [AllowAnonymous]
    public IActionResult Get()    {
       return Ok(new { role = "allowAnonymous" });
    }
}
演示部分
JWT
分别运行这个5个应用程序,访问http://localhost:5000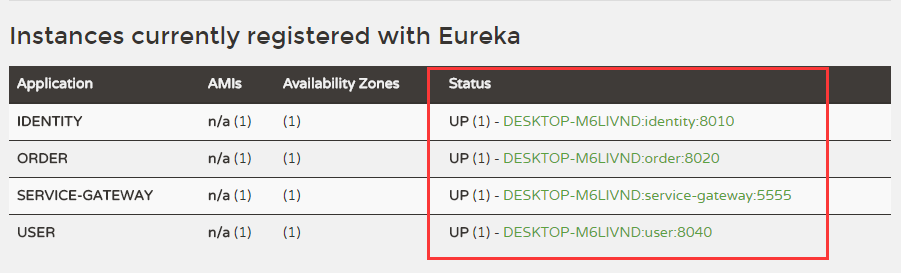
如图表示,全部运行成功。
通过postman模拟用户登录,通过api网关地址访问。
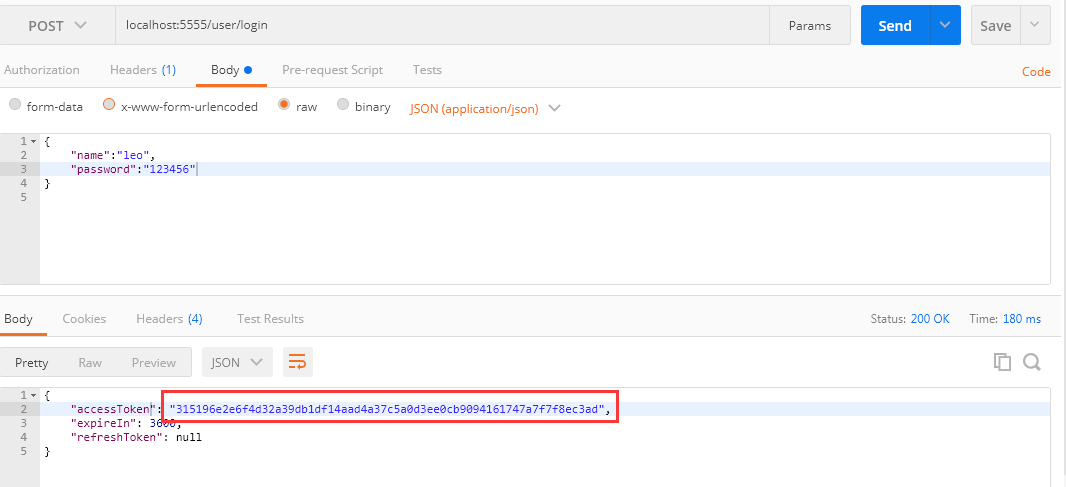
url:http://localhost:5555/user/login
method:post
requestBody:
{
"name":"leo",
"password":"123456"
}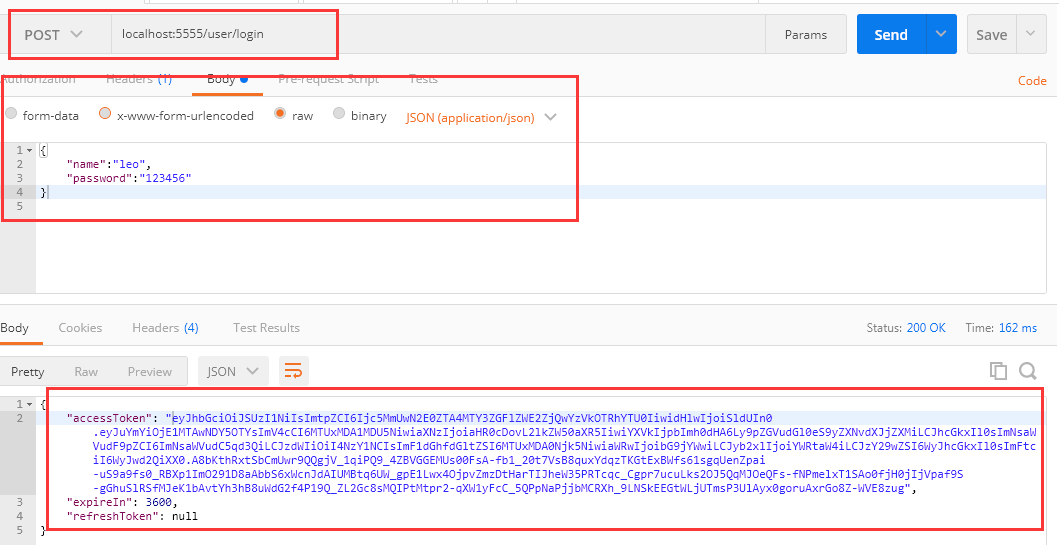
拿到token后,我们再访问订单中心的地址。
url:http://locahost:5555/order/admin
mothod:get
header: Authorization:bearer token(bearer和token中间有一个空格)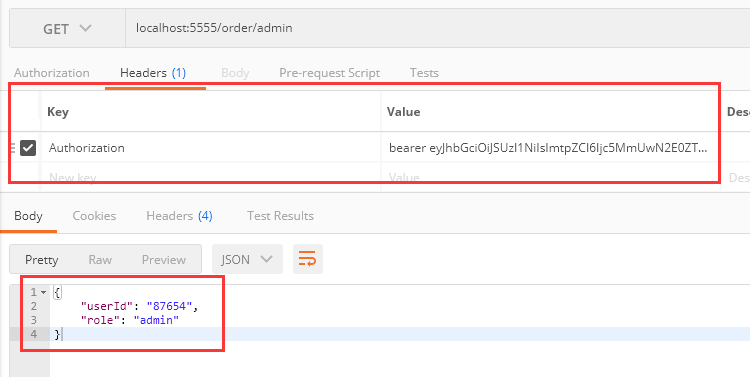
成功返回userId和role信息
我们随意修改一下token的字符串再访问,会返回401,认证不会通过。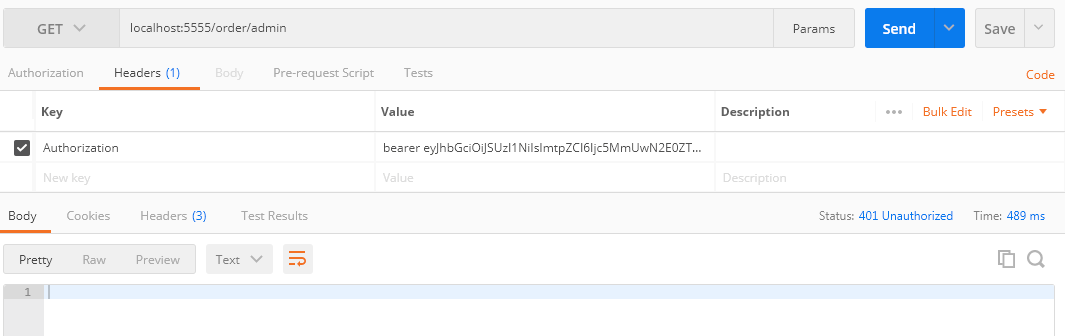
这里需要注意的是zuul默认不支持header的传递,需要在网关服务里面增加一个配置zuul.sensitive-headers=true
这个时候我们修改url地址http://locahost:5555/order/normal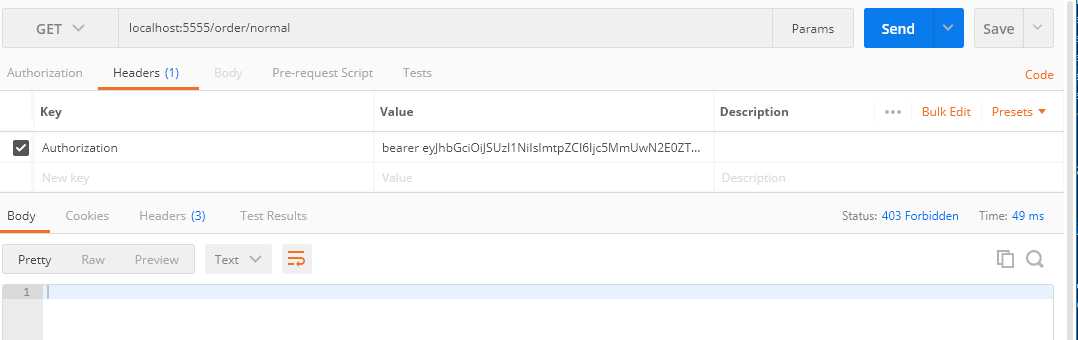
返回了403表示这个接口没有权限
再修改地址访问http://locahost:5555/order/any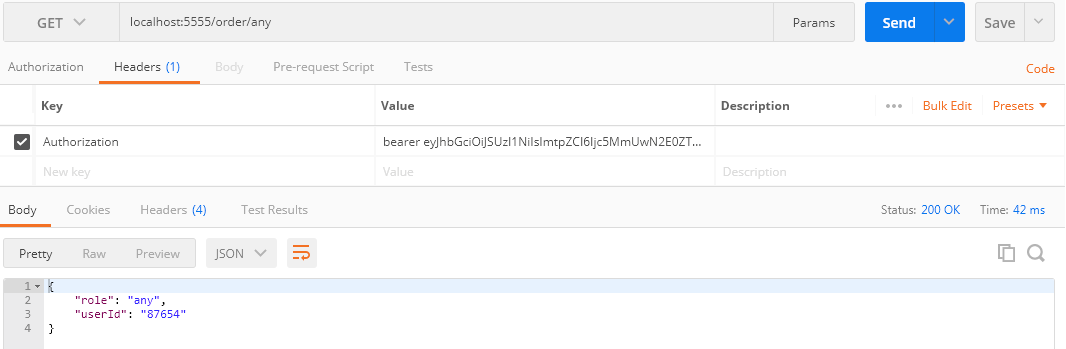
这个接口只要授权用户都可以访问。
最后这个接口http://locahost:5555/order就比较容易理解是一个匿名用户都可以访问的接口不用做身份验证,我们去掉header信息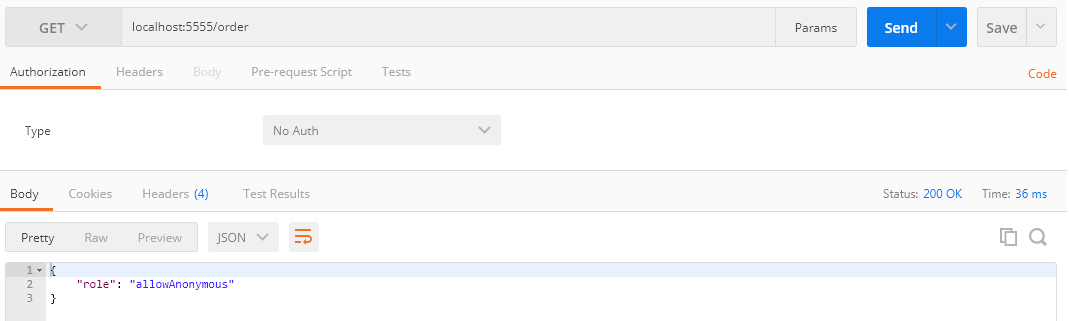
我们可以再试试另一个用户mickey/123456试试,篇幅有限,这里就不再做描述了,mickey这个用户拥有http://locahost:5555/order/normal这个接口的访问权限。
Reference
切换一下配置文件,来支持reference,修改User项目的appsettings.json文件
 "IdentityServer": {    //"ClientId": "client.jwt",    //"ClientSecrets": "AB2DC090-0125-4FB8-902A-34AFB64B7D9B",    "ClientId": "client.reference",    "ClientSecrets": "A30E6E57-086C-43BE-AF79-67ADECDA0A5B"
  }
重新运行程序
通过postman模拟用户登录,通过api网关地址访问。
url:http://localhost:5555/user/login
method:post
requestBody:
{
"name":"leo",
"password":"123456"
}
我们可以看到accessToken和JWT的完全不一样,很短的一个字符串,这个时候我们打开redis客户端可以找个这个信息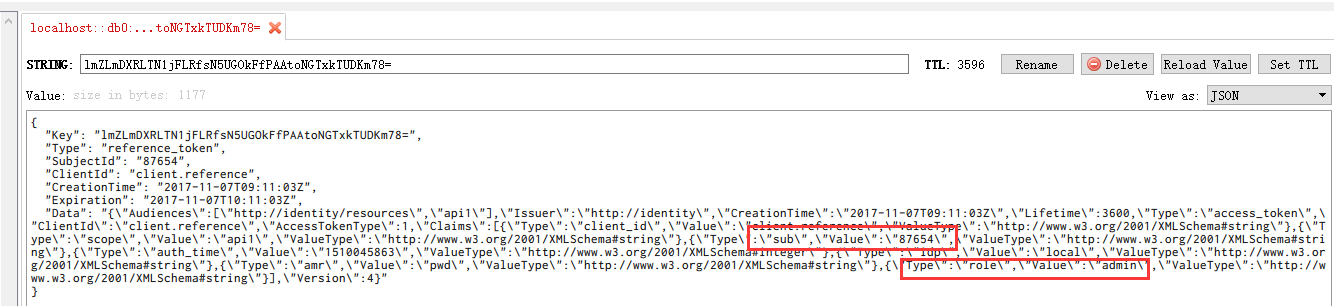
用户信息是保存在了redis里面。这里的key是通过加密的方式生成的。
拿到token后,我们再访问订单中心的地址。
url:http://locahost:5555/order/admin
mothod:get
header: Authorization:bearer token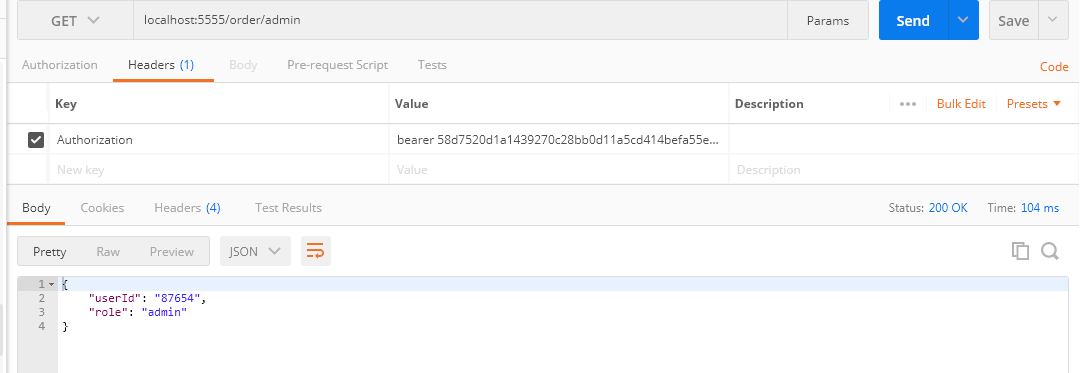
验证成功,后面的几个接口和上面一样,同学们自己来演示。
后记
通过上面的例子,我们把整个授权认证流程都走了一遍(JWT和Reference),通过Postman来模拟客户端的请求,Ids4的东西实在是太多,我没办法在这里写的太全,大家可以参考一下园子里面关于Ids4的文章。这篇文章例子比较多,强烈建议大家先下载代码,跟着博客的流程走一次,然后自己再按照步骤写一遍,这样才能加深理解。顺便给自己打个广告,笔者目前正在考虑新的工作机会,如果贵公司需要使用.NET core来搭建微服务平台,我想我非常合适。我的邮箱240226543@qq.com。
关于授权认证部分大家可以看看园子里面雨夜朦胧的博客,他通过源代码分析写的非常透彻。
示例代码
所有代码均上传github。代码按照章节的顺序上传,例如第一章demo1,第二章demo2以此类推。
求推荐,你们的支持是我写作最大的动力,我的QQ群:328438252,交流微服务。
原文地址: http://www.cnblogs.com/longxianghui/p/7800316.html