
阅读目录:
- 1. Spring Cloud Eureka 注册服务及调用
- 2. Spring Cloud Hystrix 断路器
- 3. Spring Cloud Hystrix 指标监控
- 4. Spring Cloud Config 配置中心
现在主流的开发平台是微服务架构,在众多的微服务开源项目中,Spring Cloud 非常具有代表性,但实现平台是基于 Java,那在 .NET Core 平台下,如何兼容实现 Spring Cloud 呢?答案就是 Steeltoe,或者你也可以自行实现,因为 Spring Cloud 各组件基本都是基于 REST HTTP 接口实现,你可以使用任何语言实现兼容。
关于 Steeltoe 的官方介绍:
Steeltoe is an open source project that enables .NET developers to implement industry standard best practices when building resilient microservices for the cloud. The Steeltoe client libraries enable .NET Core and .NET Framework apps to easily leverage Netflix Eureka, Hystrix, Spring Cloud Config Server, and Cloud Foundry services.
这边就不翻译了,需要注意的几点:
- Netflix Eureka:服务注册中心,实现服务注册,以及服务发现调用。
- Hystrix:断路器,实现熔断处理。
- Spring Cloud Config Server:分布式配置中心,主要是读取配置中心的信息。
- Cloud Foundry:开源 PaaS 云平台,Steeltoe 基本都运行在此平台上,运行在其他平台兼容不好。
另外,Steeltoe 不仅支持 .NET Core,还支持 .NET Framework(具体 ASP.NET 4.x 版本)。
1. Spring Cloud Eureka 注册服务及调用
项目代码:https://github.com/yuezhongxin/Steeltoe.Samples/tree/master/Discovery-CircuitBreaker/AspDotNetCore
首先,需要部署一个或多个 Spring Cloud Eureka 服务注册中心,可以使用 Spring Boot 很方便进行实现,这边就不说了。
创建一个 APS.NET Core 应用程序(2.0 版本),然后 Nuget 安装程序包:
> install-package Pivotal.Discovery.ClientCore
在appsettings.json配置文件中,增加下面配置:
{
  "spring": {
    "application": {
      "name": "fortune-service"
    }
  },
  "eureka": {
    "client": {
      "serviceUrl": "http://192.168.1.32:8100/eureka/",
      "shouldFetchRegistry": true, //Enable or disable registering as a service
      "shouldRegisterWithEureka": true, //Enable or disable discovering services
      "validate_certificates": false
    },
    "instance": {
      //"hostName": "localhost",
      "port": 5000
    }
  }}
这样我们启动 APS.NET Core 应用程序,就会将fortune-service服务注册到 Eureka 中了。
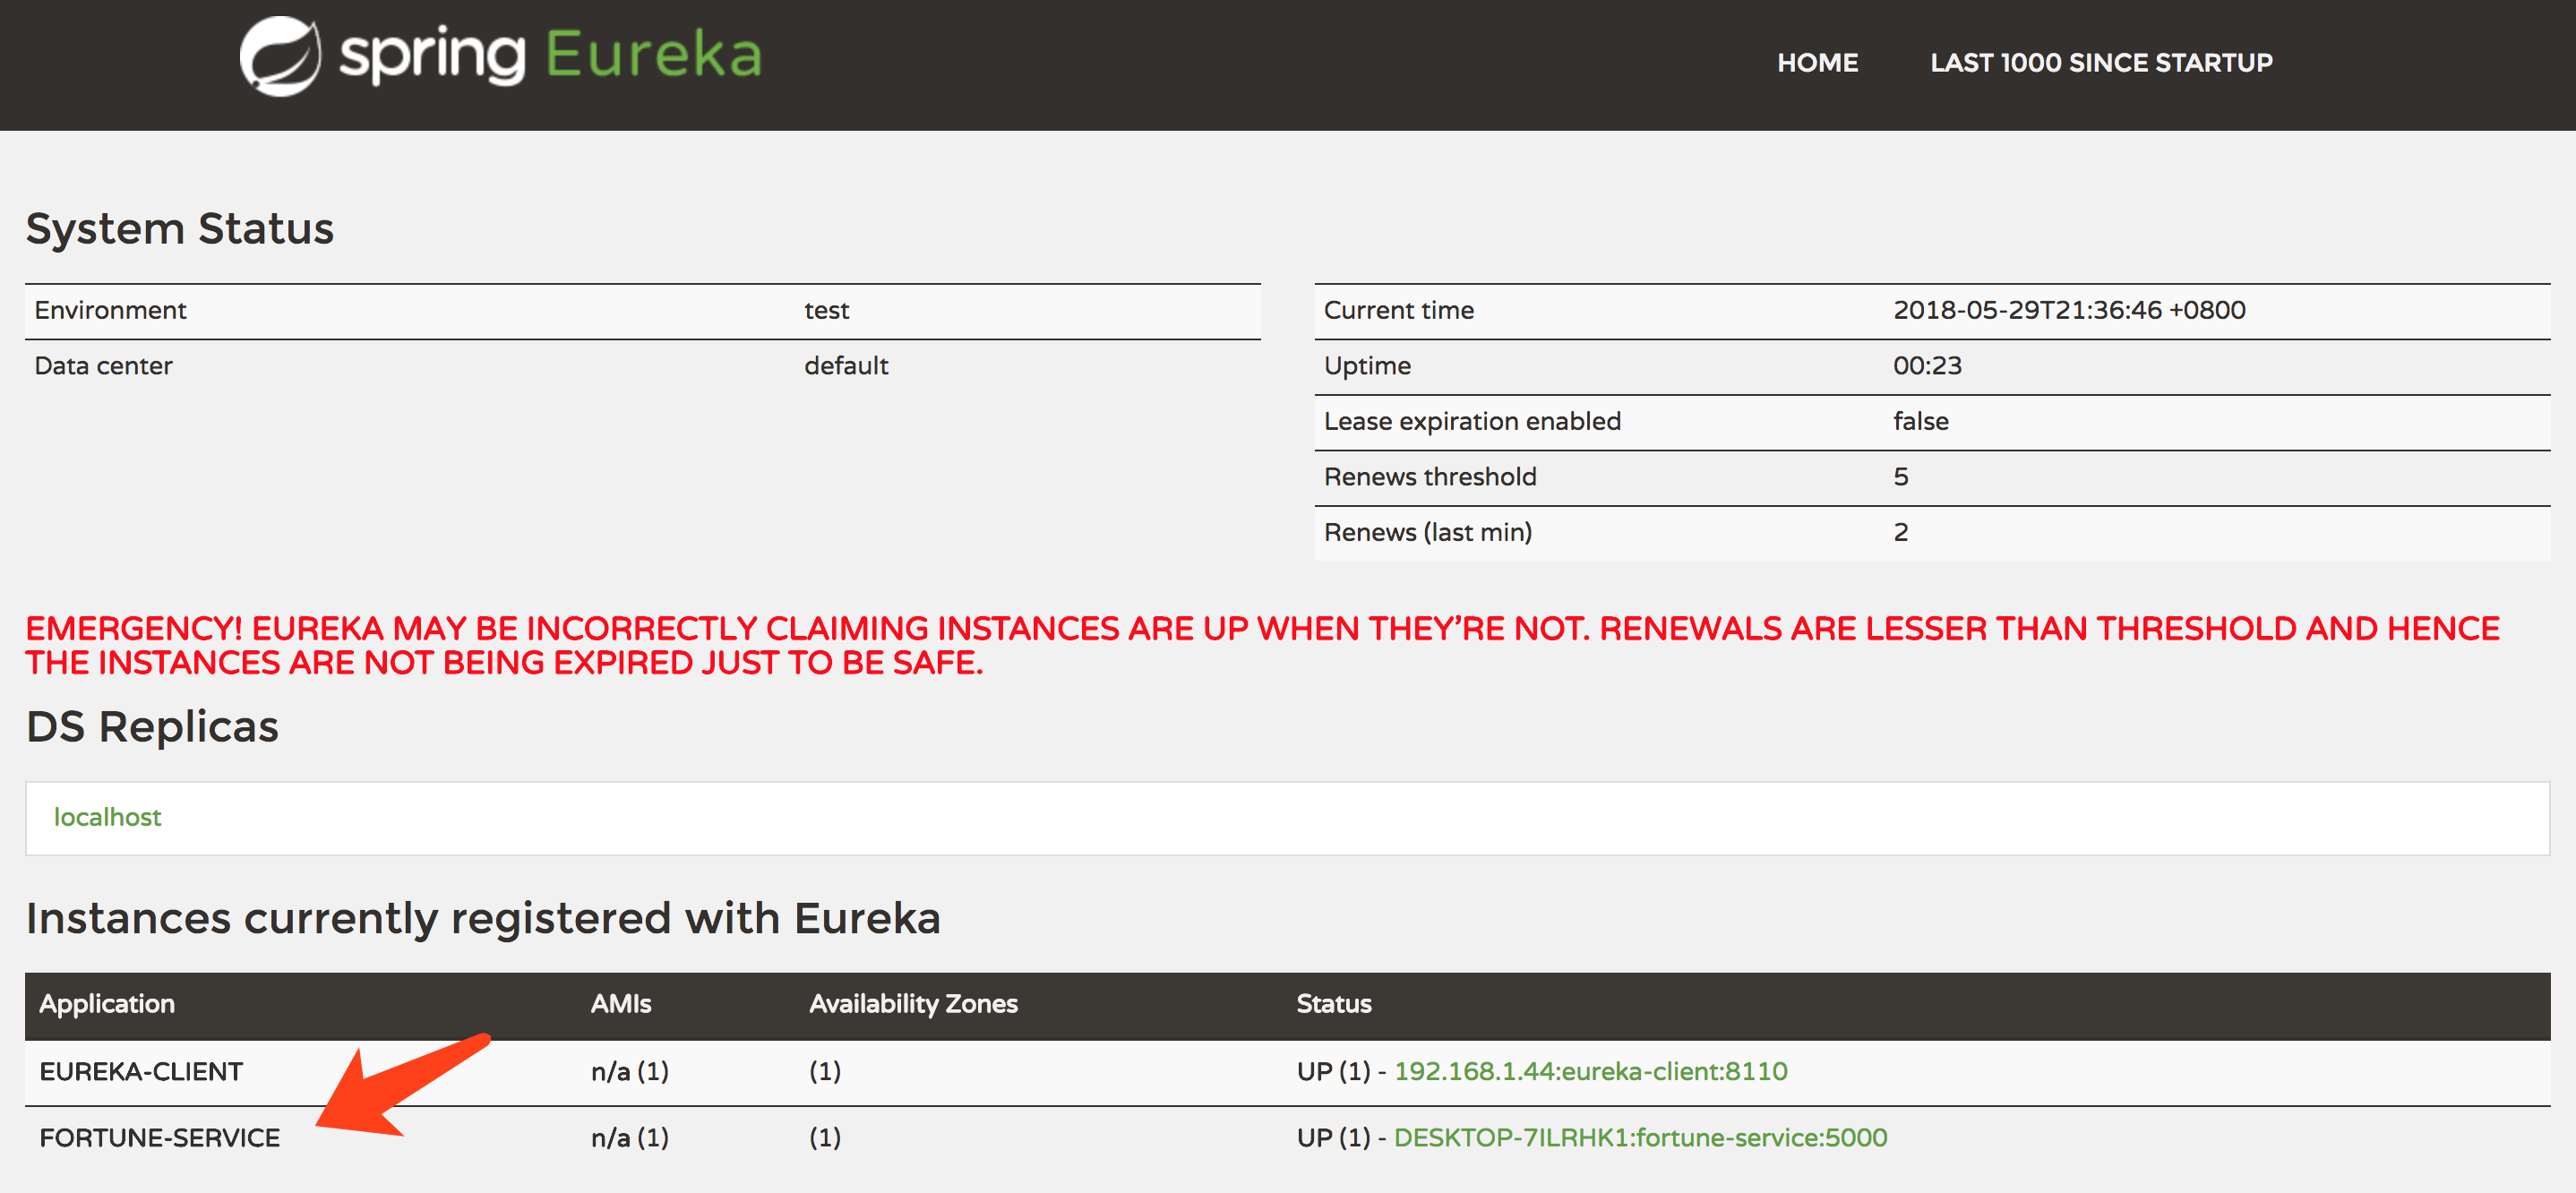
EUREKA-CLIENT是用 Spring Boot 实现的一个服务,下面我们测试FORTUNE-SERVICE如何调用EUREKA-CLIENT。
创建一个IEurekaClientService接口:
public interface IEurekaClientService{    Task<string> GetServices();
}
然后再创建IEurekaClientService接口的实现EurekaClientService:
-
public class EurekaClientService : IEurekaClientService -
{ -
DiscoveryHttpClientHandler _handler; -
-
private const string GET_SERVICES_URL = "http://eureka-client/home"; -
private ILogger<EurekaClientService> _logger; -
-
public EurekaClientService(IDiscoveryClient client, ILoggerFactory logFactory = null) -
:base(options) -
{ -
_handler = new DiscoveryHttpClientHandler(client, logFactory?.CreateLogger<DiscoveryHttpClientHandler>()); -
_logger = logFactory?.CreateLogger<EurekaClientService>(); -
} -
-
public async Task<string> GetServices() -
{ -
_logger?.LogInformation("GetServices"); -
var client = GetClient(); -
return await client.GetStringAsync(GET_SERVICES_URL); -
-
} -
-
private HttpClient GetClient() -
{ -
var client = new HttpClient(_handler, false); -
return client; -
} -
}
然后创建一个FortunesController:
-
[Route("api")] -
public class FortunesController : Controller -
{ -
private IEurekaClientService _eurekaClientService; -
private ILogger<FortunesController> _logger; -
public FortunesController(IEurekaClientService eurekaClientService, ILogger<FortunesController> logger) -
{ -
_eurekaClientService = eurekaClientService; -
_logger = logger; -
} -
-
// GET: api/services -
[HttpGet("services")] -
public async Task<IActionResult> GetServices() -
{ -
_logger?.LogInformation("api/services"); -
return Ok(await _eurekaClientService.GetServices()); -
} -
}
最后在Startup.cs中,添加如下配置:
-
public class Startup -
{ -
public Startup(IConfiguration configuration) -
{ -
Configuration = configuration; -
} -
-
public IConfiguration Configuration { get; private set; } -
-
// This method gets called by the runtime. Use this method to add services to the container. -
public void ConfigureServices(IServiceCollection services) -
{ -
// 加载服务注册配置 -
services.AddDiscoveryClient(Configuration); -
-
// Add framework services. -
services.AddMvc(); -
} -
-
// This method gets called by the runtime. Use this method to configure the HTTP request pipeline. -
public void Configure(IApplicationBuilder app, IHostingEnvironment env, ILoggerFactory loggerFactory, IApplicationLifetime lifetime) -
{ -
app.UseStaticFiles(); -
-
app.UseMvc(); -
-
// 启动服务注册 -
app.UseDiscoveryClient(); -
} -
}
然后重新启动服务,执行命令:
$ curl http://192.168.1.3:5000/api/servicesServices(get all by DiscoveryClient): [eureka-client, fortune-service]%
可以看到,调用是成功的,实际调用的是EUREKA-CLIENT服务的接口,获取的是 Eureka 注册中心,所有的注册服务信息。
ASP.NET 4.x 版本的实现,和上面的类似,这边就不叙述了,可以查看项目代码:https://github.com/yuezhongxin/Steeltoe.Samples/tree/master/Discovery-CircuitBreaker/AspDotNet4
2. Spring Cloud Hystrix 断路器
项目代码:https://github.com/yuezhongxin/Steeltoe.Samples/tree/master/Configuration/AspDotNetCore
Spring Cloud Hystrix 的实现,需要我们对上面的项目进行改造下。
IEurekaClientService增加一个GetServicesWithHystrix接口:
public interface IEurekaClientService{    Task<string> GetServices();    Task<string> GetServicesWithHystrix();
}
然后对其进行实现:
-
public class EurekaClientService : HystrixCommand<string>, IEurekaClientService -
{ -
DiscoveryHttpClientHandler _handler; -
-
private const string GET_SERVICES_URL = "http://eureka-client/home"; -
private ILogger<EurekaClientService> _logger; -
-
public EurekaClientService(IHystrixCommandOptions options, IDiscoveryClient client, ILoggerFactory logFactory = null) -
:base(options) -
{ -
_handler = new DiscoveryHttpClientHandler(client, logFactory?.CreateLogger<DiscoveryHttpClientHandler>()); -
IsFallbackUserDefined = true; -
_logger = logFactory?.CreateLogger<EurekaClientService>(); -
} -
-
public async Task<string> GetServices() -
{ -
_logger?.LogInformation("GetServices"); -
var client = GetClient(); -
return await client.GetStringAsync(GET_SERVICES_URL); -
-
} -
-
public async Task<string> GetServicesWithHystrix() -
{ -
_logger?.LogInformation("GetServices"); -
var result = await ExecuteAsync(); -
_logger?.LogInformation("GetServices returning: " + result); -
return result; -
} -
-
protected override async Task<string> RunAsync() -
{ -
_logger?.LogInformation("RunAsync"); -
var client = GetClient(); -
var result = await client.GetStringAsync(GET_SERVICES_URL); -
_logger?.LogInformation("RunAsync returning: " + result); -
return result; -
} -
-
protected override async Task<string> RunFallbackAsync() -
{ -
_logger?.LogInformation("RunFallbackAsync"); -
return await Task.FromResult("This is a error(服务断开,稍后重试)!"); -
} -
-
private HttpClient GetClient() -
{ -
var client = new HttpClient(_handler, false); -
return client; -
} -
}
然后还需要在Startup.cs中添加注入:
public void ConfigureServices(IServiceCollection services){
     // Register FortuneService Hystrix command
    services.AddHystrixCommand<IEurekaClientService, EurekaClientService>("eureka-client", Configuration);
}
然后重启服务,执行命令:
$ curl http://192.168.1.3:5000/api/services/hystrixServices(get all by DiscoveryClient): [eureka-client, fortune-service]%
Hystrix 断路器的作用,体现在调用服务出现问题不能访问,这边可以进行熔断处理,我们把eureka-client服务停掉,然后再进行访问测试:
$ curl http://192.168.1.3:5000/api/services/hystrixThis is a error(服务断开,稍后重试)!%
可以看到,Hystrix 起到了作用。
ASP.NET 4.x 版本的实现,和上面的类似,这边就不叙述了,可以查看项目代码:https://github.com/yuezhongxin/Steeltoe.Samples/tree/master/Discovery-CircuitBreaker/AspDotNet4
3. Spring Cloud Hystrix 指标监控
项目代码:https://github.com/yuezhongxin/Steeltoe.Samples/tree/master/Discovery-CircuitBreaker/AspDotNetCore
在实际应用中,我们需要对 Hystrix 断路器进行监控,比如熔断请求有多少等等,Spring Cloud 中的实现有 Turbine 进行收集,数据展示的话使用 Hystrix Dashboard。
这边需要我们先创建一个 Hystrix Dashboard 项目,我使用的 Spring Boot 进行实现,这边就不叙述了。
我们需要再对上面的项目进行改造,在Startup.cs中添加配置,以启动 Hystrix 指标监控。
-
public class Startup -
{ -
public void ConfigureServices(IServiceCollection services) -
{ -
// Add Hystrix metrics stream to enable monitoring -
services.AddHystrixMetricsStream(Configuration); -
} -
-
// This method gets called by the runtime. Use this method to configure the HTTP request pipeline. -
public void Configure(IApplicationBuilder app, IHostingEnvironment env, ILoggerFactory loggerFactory, IApplicationLifetime lifetime) -
{ -
// Startup Hystrix metrics stream -
app.UseHystrixMetricsStream(); -
} -
}
另外,还需要配置下Fortune-Teller-Service.csproj:
<ItemGroup Condition="'$(BUILD)' == 'LOCAL'">
    <PackageReference Include="Steeltoe.CircuitBreaker.Hystrix.MetricsStreamCore" Version="2.0.0" />
    <PackageReference Include="RabbitMQ.Client" Version="5.0.1" />
  </ItemGroup><ItemGroup Condition="'$(BUILD)' == ''">
  <PackageReference Include="Steeltoe.CircuitBreaker.Hystrix.MetricsEventsCore" Version="2.0.0" />
  <PackageReference Include="System.Threading.ThreadPool" Version="4.3.0" /></ItemGroup>
然后重启项目,然后浏览器打开:http://192.168.1.3:5000/hystrix/hystrix.stream
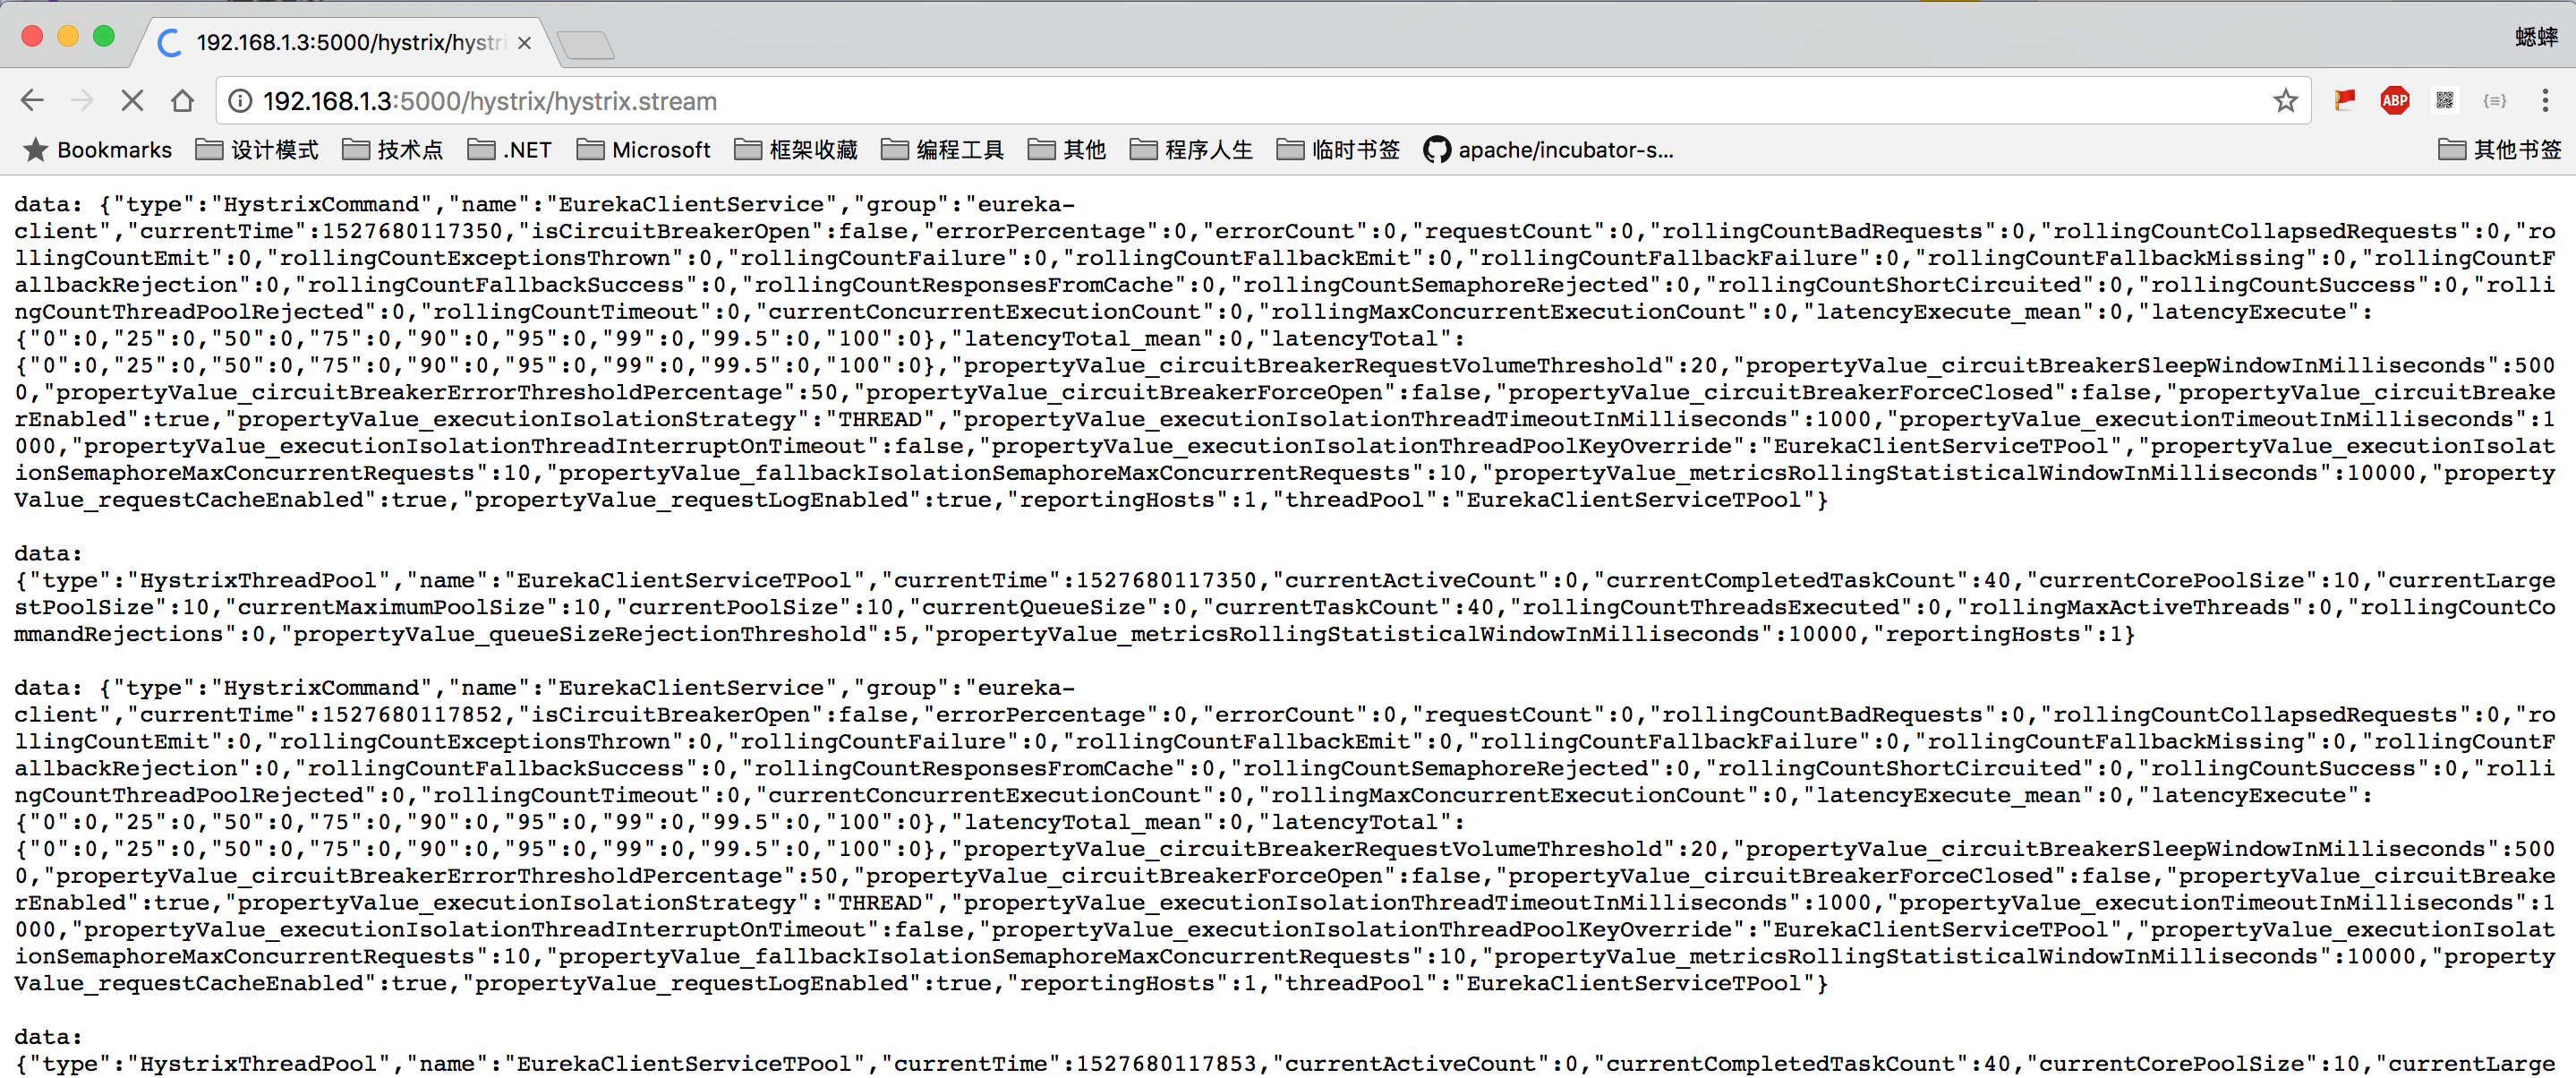
会看到不断实时刷新的 Hystrix 指标监控数据了,但显示并不友好,我们还需要在仪表盘中显示。
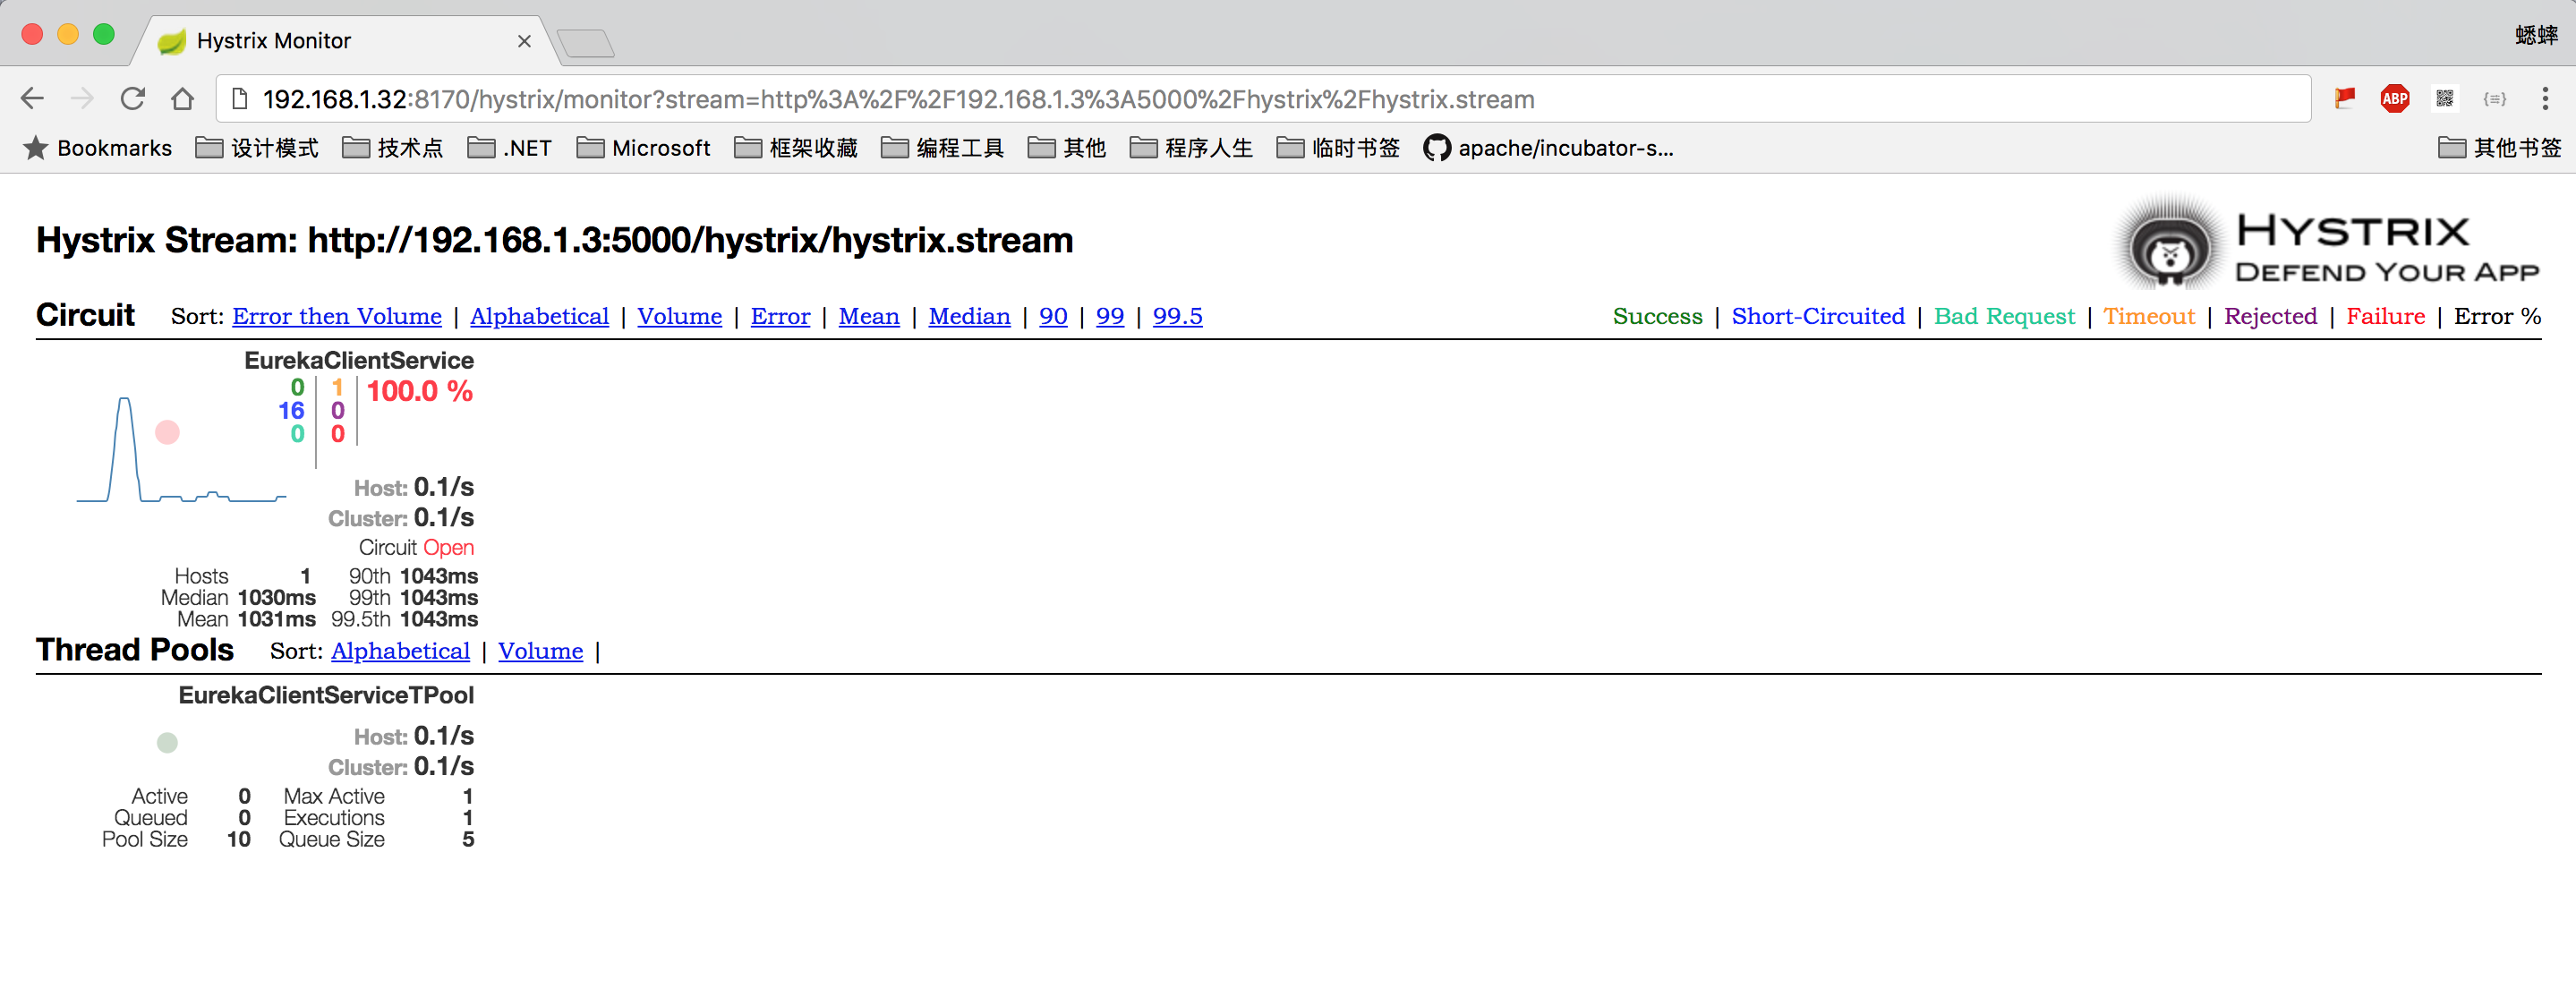
浏览器打开 Hystrix Dashboard(地址:http://192.168.1.31:8170/hystrix),然后在输入框中输入:http://192.168.1.3:5000/hystrix/hystrix.stream
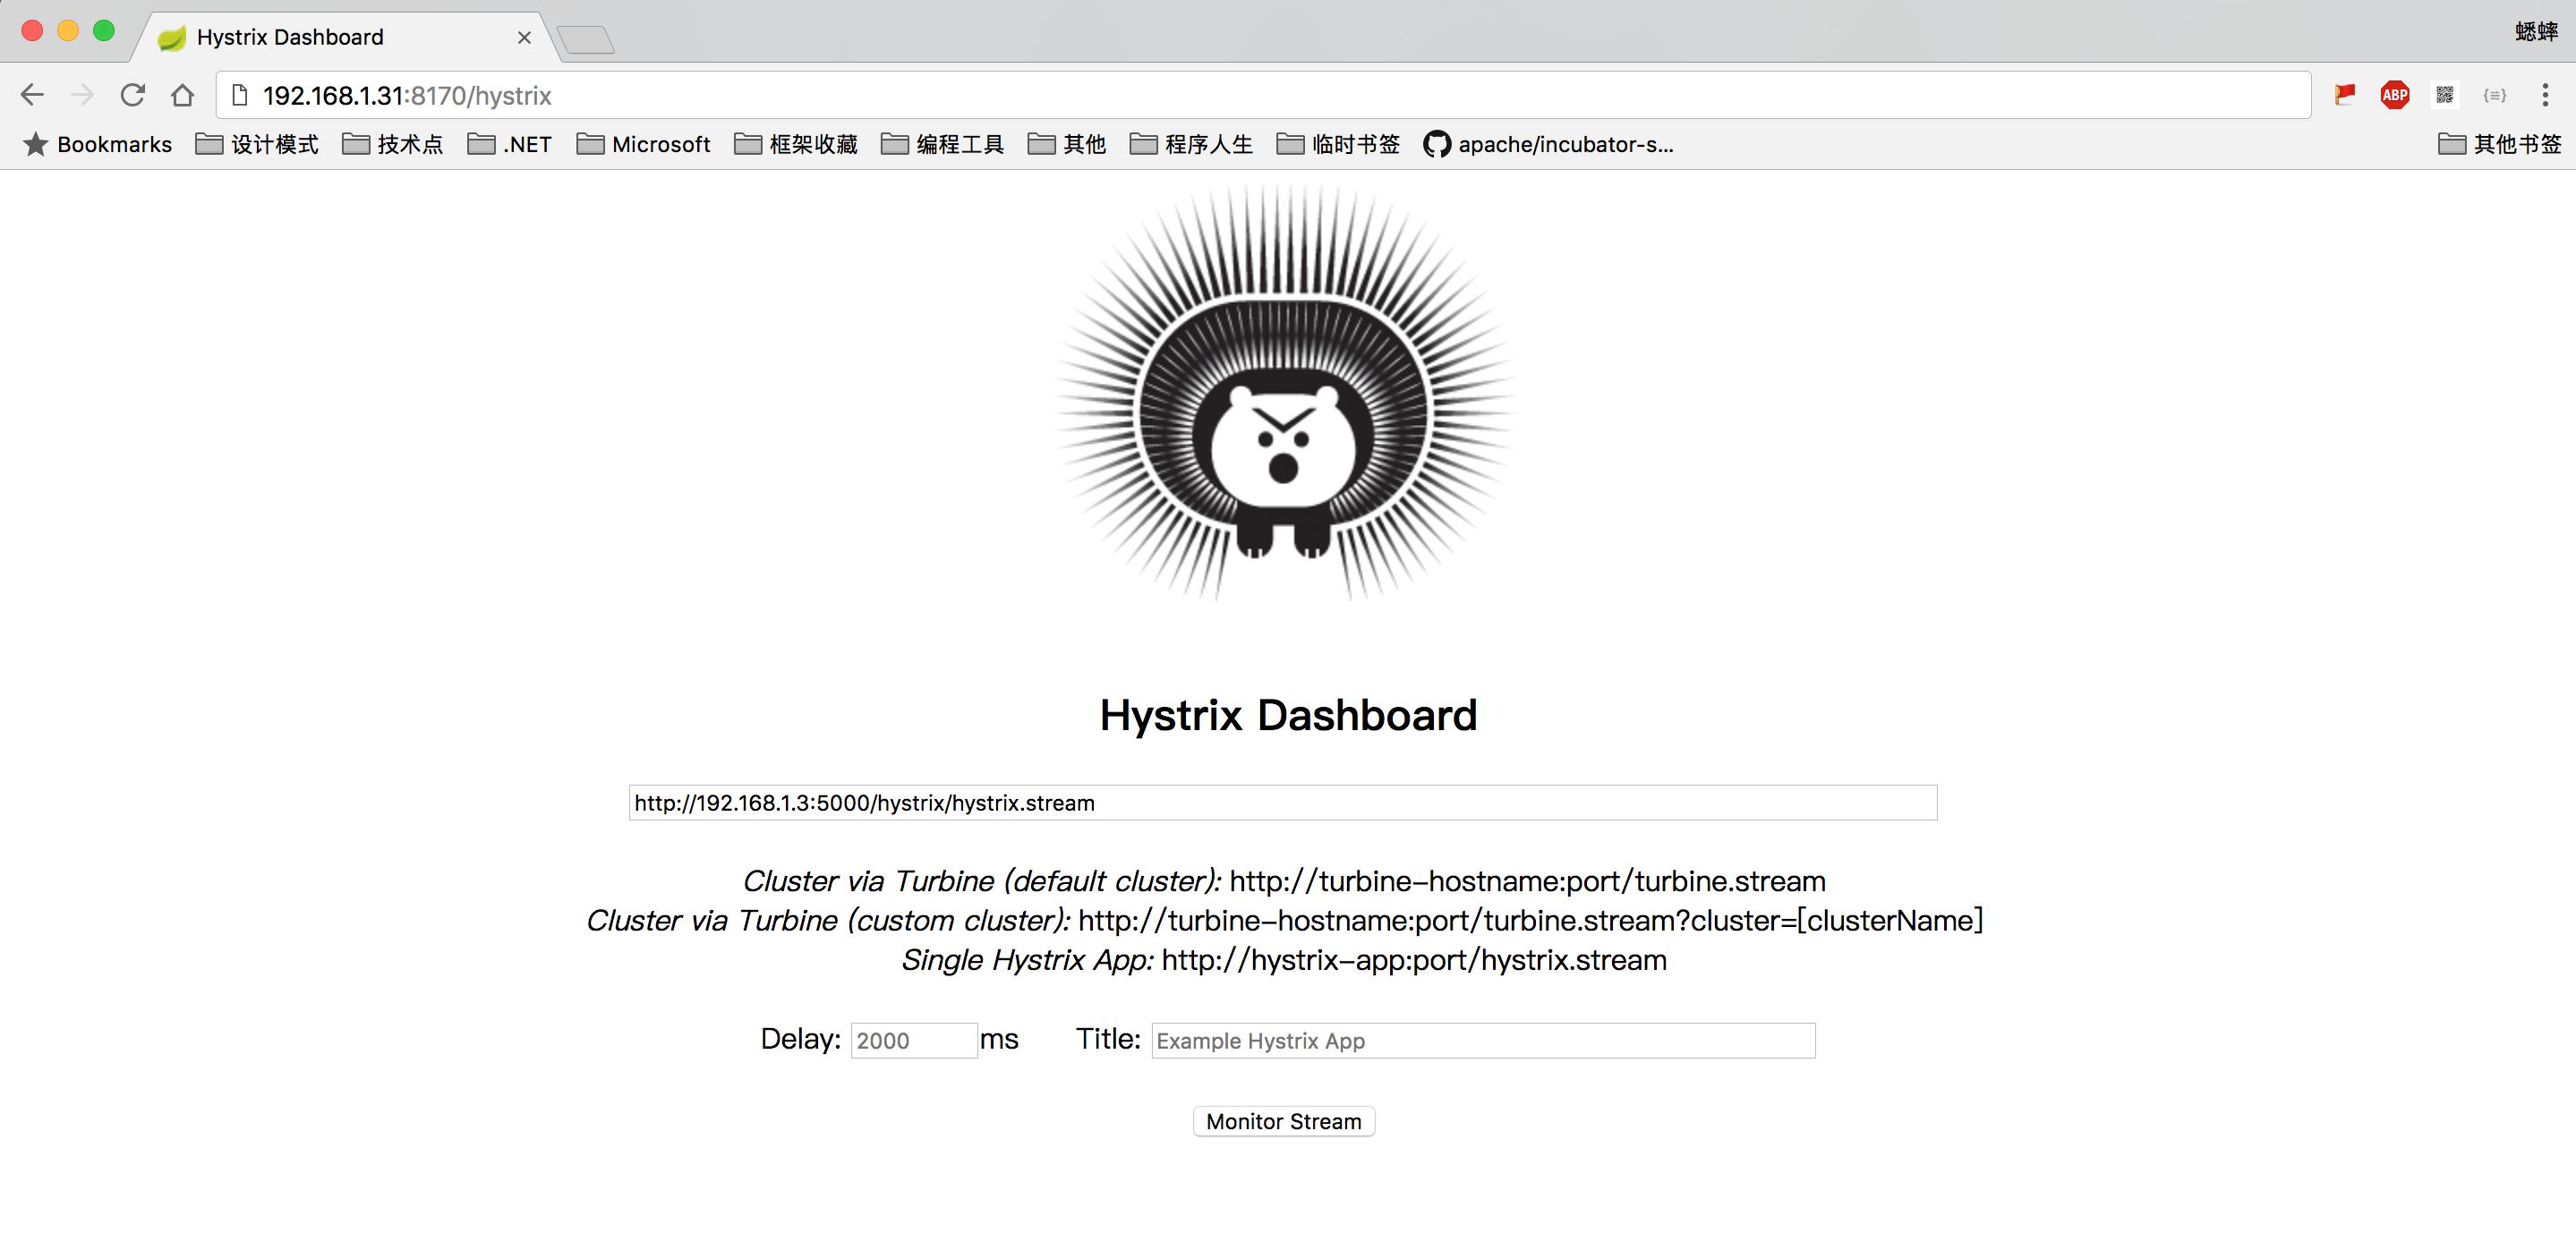
然后点击 Monitor Stream 按钮,就可以看到 Hystrix 图形化监控了(多次请求http://192.168.1.3:5000/api/services/hystrix,以便测试):
另外,ASP.NET 4.x 版本配置的话,访问http://192.168.1.3:5000/hystrix/hystrix.stream会报 404 错误,原因是 ASP.NET 4.x 版本暂不支持 Cloud Foundry 以外的平台,详情参见:
4. Spring Cloud Config 配置中心
项目代码:https://github.com/yuezhongxin/Steeltoe.Samples/tree/master/Configuration/AspDotNetCore
需要注意的是,这边只测试 Steeltoe 读取配置中心数据,需要先开发一个 Spring Cloud Config Server 配置中心服务,这边就不叙述了。
我使用的 GitHub 作为配置中心仓库,xishuai-config-dev.yml配置详情:
info: profile: dev name: xishuai7 password: '{cipher}AQAc+v42S+FW7H5DiATfeeHY887KLwmeBq+cbXYslcQTtEBNL9a5FKbeF1qDpwrscWtGThPsbb0QFUMb03FN6yZBP2ujF29J8Fvm89igasxA7F67ohJgUku5ni9qOsMNqm5juexCTGJvzPkyinymGFYz55MUqrySZQPbRxoQU9tcfbOv9AH4xR/3DPe5krqjo3kk5pK6QWpH37rBgQZLmM7TWooyPiRkuc5Wn/1z6rQIzH5rCLqv4C8J16MAwgU1W+KTrHd4t8hIDAQG9vwkL9SYAvlz38HMKL9utu2g4c9jhAJE/H0mePlp+LDrWSgnC+R+nyH91niaUlwv3wsehP0maYCgEsTJn/3vsNouk5VCy4IGGZbkPubuJM6hE8RP0r4='
注:对password进行了加密处理。
创建一个 APS.NET Core 应用程序(2.0 版本),然后 Nuget 安装程序包:
> install-package Steeltoe.Extensions.Configuration.ConfigServerCore
在appsettings.json配置文件中,增加下面配置:
{
  "spring": {
    "application": {
      "name": "xishuai-config" //配置文件名称
    },
    "cloud": {
      "config": {
        "uri": "http://manager1:8180", //指向配置中心地址
        "env": "dev" //配置中心profile
      }
    }
  }}
然后创建一个ConfigServerData模型:
-
public class ConfigServerData -
{ -
public Info Info { get; set; } -
} -
-
public class Info -
{ -
public string Profile { get; set; } -
public string Name { get; set; } -
public string Password { get; set; } -
}
增加HomeController访问:
-
public class HomeController : Controller -
{ -
private IOptionsSnapshot<ConfigServerData> IConfigServerData { get; set; } -
-
private IConfigurationRoot Config { get; set; } -
-
public HomeController(IConfigurationRoot config, IOptionsSnapshot<ConfigServerData> configServerData) -
{ -
if (configServerData != null) -
IConfigServerData = configServerData; -
-
Config = config; -
} -
-
public IActionResult Error() -
{ -
return View(); -
} -
-
public ConfigServerData ConfigServer() -
{ -
var data = IConfigServerData.Value; -
return data; -
} -
-
public IActionResult Reload() -
{ -
if (Config != null) -
{ -
Config.Reload(); -
} -
-
return View(); -
} -
}
Startup.cs中增加配置:
-
public class Startup -
{ -
public Startup(IHostingEnvironment env) -
{ -
var builder = new ConfigurationBuilder() -
.SetBasePath(env.ContentRootPath) -
.AddJsonFile("appsettings.json", optional: false, reloadOnChange: true) -
.AddJsonFile($"appsettings.{env.EnvironmentName}.json", optional: true) -
.AddEnvironmentVariables() -
.AddConfigServer(env); -
Configuration = builder.Build(); -
} -
-
public IConfiguration Configuration { get; set; } -
-
// This method gets called by the runtime. Use this method to add services to the container. -
public void ConfigureServices(IServiceCollection services) -
{ -
services.AddOptions(); -
-
// Optional: Adds IConfiguration and IConfigurationRoot to service container -
services.AddConfiguration(Configuration); -
-
// Adds the configuration data POCO configured with data returned from the Spring Cloud Config Server -
services.Configure<ConfigServerData>(Configuration); -
} -
}
启动项目,然后执行命令:
$ curl http://192.168.1.3:5000/home/ConfigServer{"info":{"profile":"dev","name":"xishuai7","password":"xishuai123"}}
当配置中心数据更新了,可以访问http://192.168.1.3:5000/home/Reload进行刷新配置。
ASP.NET 4.x 版本的实现,和上面的类似,这边就不叙述了,可以查看项目代码:https://github.com/yuezhongxin/Steeltoe.Samples/tree/master/Configuration/AspDotNet4
参考资料:
- http://steeltoe.io/
- https://github.com/SteeltoeOSS/Samples
- Enabling .NET Core Microservices with Steeltoe and Pivotal Cloud Foundry
原文地址: https://www.cnblogs.com/xishuai/p/steeltoe-and-spring-cloud-eureka-config-hystrix.html